![]() If you have signed up for Google Apps (Standard, Premier or Education Edition) and want to migrate your organization’s (or personal) email, contacts and calendar to Google Apps from Microsoft Outlook profiles or PST files, you may find this “Google Apps Migration for Microsoft Outlook” tool very useful. This tool is recommended by Google Apps.
If you have signed up for Google Apps (Standard, Premier or Education Edition) and want to migrate your organization’s (or personal) email, contacts and calendar to Google Apps from Microsoft Outlook profiles or PST files, you may find this “Google Apps Migration for Microsoft Outlook” tool very useful. This tool is recommended by Google Apps.
With this tool, you can perform a user driven individual selective migration of your inbox, sent items, calendar and contacts from Microsoft Outlook into Google Apps. In order to install and use this tool, you should have Windows XP SP3 or Windows Vista SP1 and Microsoft Outlook 2003(SP3)/2007(SP2).
What is Google Apps Migration for Microsoft Outlook?
Google Apps Migration for Microsoft Outlook is a desktop utility that lets Microsoft Outlook users import your existing mail, personal contacts, and calendar events from a Microsoft Exchange account or PST file into a Google Apps Standard Edition, Premier Edition or Education Edition account. You can configure and run your migration by stepping through an easy-to-follow wizard. You can also run the utility as a command line tool.
With Google Apps Migration for Microsoft Outlook, you can:
- Import mail, calendars, and personal contacts, either all at once or in separate stages
- Import only mail sent before or after a specific date
- Skip importing Junk E-mail and Deleted items
- Exclude specific mail folders from being imported (requires running the command-line utility)
- Monitor the progress of your migration
- Easily pause and resume the migration
- Run subsequent migrations that import only new data (not data that’s already been imported)
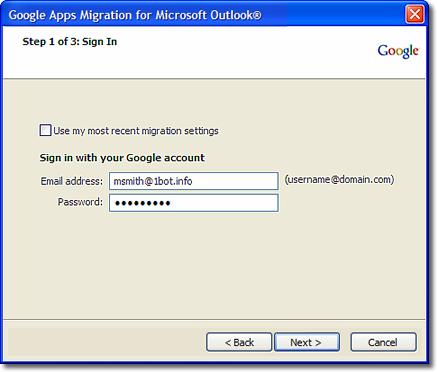
After downloading and installing the tool, run the program from the Windows Start menu, open Google Apps Migration for Microsoft Outlook. You are prompted to sign in to your Google Apps account. Signing in here lets Google Apps Migration connect to your account to get ready for importing.
Enter the email address and password that you use to log in to your Google Apps account.
[advt]
Next, the tool asks you to select where to import data from. You can import data directly from a Microsoft Exchange profile. Or export it first from Microsoft Outlook as one or more PST files, and import those files. If you have exported your data to a PST file, choose From PST File(s) and browse to the file on your computer or network. You can’t import PST files that are read-only. The migration utility needs write permission to access your data.
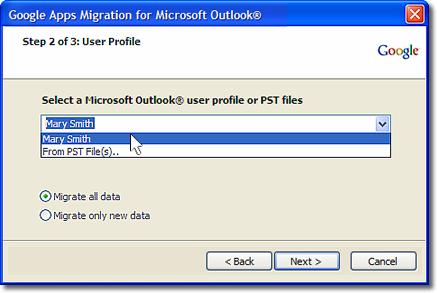
If you’ve already imported data into this account, choose the appropriate migration option. Select “migrate all data” to import all your mail, contacts, and calendar events. You can choose this option for your initial migration. If you already have data in this Google Apps account, choosing this option will import duplicate contacts and overwrite your existing calendar data (email won’t be duplicated).
“Migrate only new data” option imports only data that hasn’t been imported before (doesn’t duplicate contacts or overwrite existing calendar data). Choose this option to resume a migration that didn’t fully complete, or to import data that arrived after your first migration.
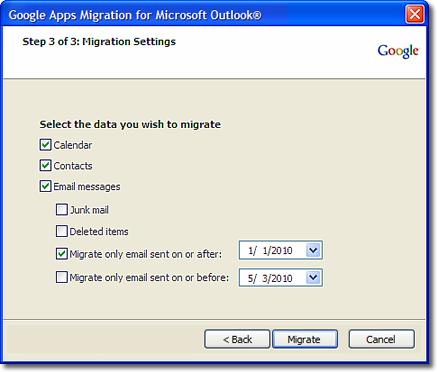
Finally, you need to select what data to import – your email, contacts, calendar events, or all of them. You can specify whether to import only mail that was sent before or after a particular date (just check each appropriate box). To speed up your import, uncheck Junk mail and Deleted items as you probably don’t need any of these messages.
Click Migrate in the wizard to begin importing. If you’re importing from a Microsoft Outlook profile rather than a PST file, you might be prompted to log in to your profile.
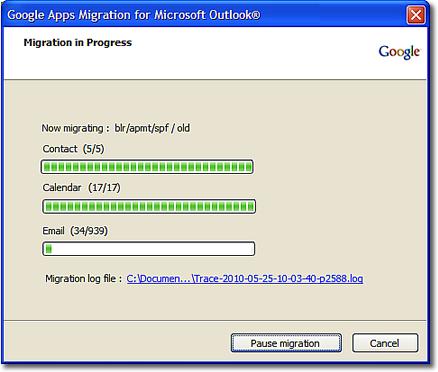
Contacts are imported first, followed by calendar data, and then email. You can monitor your migration’s process to see the number of items migrated and the number of items remaining.
Depending on how much mail and other data you have, it might take several hours for all of it to import. To temporarily halt importing, click Pause Migration. Click Resume Migration to continue importing from where you left off. To restart a migration, simply rerun the wizard and select the option to Migrate only new data.

Be the first to comment