![]() First of all, let me tell you that I am not an expert Linux user. I am writing here my trial and error experience with Ubuntu installation, dual booting, boot menu updating, etc., hoping to make a few other people also enthusiastic about the free software.
First of all, let me tell you that I am not an expert Linux user. I am writing here my trial and error experience with Ubuntu installation, dual booting, boot menu updating, etc., hoping to make a few other people also enthusiastic about the free software.
I have already moved on to the free (free as in freedom, not just cheaper) software and wagon my not using other Microsoft products except Vista. I now prefer Portable Apps for all utility applications. I got Vista pre-installed with the laptop and I am happy with it now. In the meantime, I am creating interest in Linux desktops like Ububtu and hoping to slowly move over to it as my primary development environment.
How Do I Try Out Ubuntu?
You can get an Ubuntu Live CD, which can boot into Ubuntu. You will be able to use it, access the applications and try out Ubuntu. But remember, you cannot write files to the CD.
![]() You can also try out the Wubi, (Windows-based Ubuntu Installer). Wubi allows you to install and uninstall Ubuntu as any other Windows application. This is the simplest way of getting your hands wet with Linux / Ubuntu. Wubi does not require you to modify the partitions of your PC, or to use a different bootloader, and does not install special drivers. Wubi works just like any other application installed on to your Windows PC.
You can also try out the Wubi, (Windows-based Ubuntu Installer). Wubi allows you to install and uninstall Ubuntu as any other Windows application. This is the simplest way of getting your hands wet with Linux / Ubuntu. Wubi does not require you to modify the partitions of your PC, or to use a different bootloader, and does not install special drivers. Wubi works just like any other application installed on to your Windows PC.
The next option is to have the proper installation of Ubuntu on to its own partition. Let us discuss this below.
[advt]
Download Ubuntu ISO Image
OK, now back to the subject of this post. I want to install Ubuntu on to my new laptop. The hard disk had two partitions – C Drive for the Windows and data, and D drive for Compaq Recovery. The recovery partition is small and used only for booting the Presario notebook in recovery mode. I do not have the Vista CD in order to format the disk, partition it and install Vista on to a partition, freeing another partition for Ubuntu or other operating systems.
I downloaded ubuntu-8.04.1 desktop version ISO cd image (694 MB) using µTorrent client. I prefer using a torrent for downloading large single files like this ISO CD image, which is faster and reliable.
Create Live CD (Bootable)
Then I used the InfraRecorder Portable in my thumb drive Portable Apps Suite to write the ISO image on to a blank CD. That was real quick with no glitches. I tried the live CD on my laptop and found Ubuntu really interesting to me. I have sensed troubles with Wi-Fi enabling in Ububtu, but I don’t want that to constrain me from trying out Ububtu.
Free Up Vista’s Space for Ubuntu
Now that I am happy with Ubuntu, I need to get the disk partitioned by freeing space from Windows Vista installation. Windows Vista can shrink its own partition without the need to use third-party software.
To start with, run the defragmentation tool on C: so that free space will be arranged contiguously.
Assuming that you have enough free space in your disk drive, let us free up enough space for Ubuntu. Open the Disk Management panel by
- Control Panel -> Administrative Tools -> Computer Management -> Disk Management
- Right click on My Computer on desktop -> Manage -> Storage -> Disk Management
Now Right click on the primary partition where Vista in installed (C drive in most cases) and select Shrink Volume.
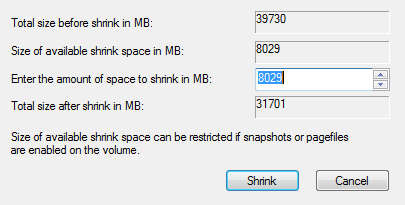
The Shrink Volume window displays total size before shrinking and size of available shrink (free) space. Enter the size of the new partition in MBs in the Amount of Space to Shrink box. This should be less than the available free shrinkable space. For example, if you have more than 25GB free available in C drive, and want to have a new partition of 15 GB for Ubuntu, enter 15360 (15 * 1024 MB). The remaining space in C drive after the shrink is displayed as total size after shrink. You don’t need to format the space.
If you do not trust your skills, I suggest having a backup of data from your Windows Vista on a DVD or Thumb drive or Portable Disk 🙂 Also make sure that, you have burnt the laptop recovery DVD/CD or you have the Vista original installation CD with you in case you goof up something!
Install Ubuntu
Now that you have rescued the unused space from the monopoly of Vista, the Ubuntu installer will use the free space.
To install Ubuntu, insert the Ubuntu Live CD plus installation onto the CD drive, reboot your computer to load Ubuntu. Once you have the Ubuntu live desktop, mount the Vista partitions (C drive, etc), which makes sure that the Live CD can recognize and see the vista partitions. Now click on the install link and follow the simple instructions.
When asked to select the partition to install, select the space you have recently freed from Vista. I mounted it as Ext2 volume on the root. The installation can also help you install grub for dual booting selection at start up. If you need any assistance in installing Ubuntu, refer to this great documentation.
Ubuntu Installation Tips
The installer asks for resizing the partitions. I prefer the manual partitioning option. On choosing the “Manually edit partition table” option, available current partitions are listed. Now resize the selected partition. Provide at least 10GB, I prefer 15GB minimum if you are going to use Ubuntu frequently.
But in some cases, it displays the partition you have created earlier. you need to use the partition editor and change the format to either ext2 or ext3. I used ext2.
It is also suggested to have a swap partition also created, which is of at least your amount of RAM. (I did not create the swap space, as my single hard disk did not support one more partitions).
When installation process is complete, reboot the computer. On reboot, remove your Ubuntu CD from the drive, you will be presented with a list of operating systems to boot. Ubuntu automatically detects your Windows installation and add an option to boot it on this screen.
Master Boot Record Updates
Ubuntu installs the GRUB boot manager by default. In order to load Ubuntu, the Master Boot Record (MBR) of the first hard disk needs to be updated. The MBR code is changed to point to the boot loader in Ubuntu.
On boot, you get a list of operating systems to choose from – Ubuntu and Vista (Longhorn). If you do nothing, Ubuntu boots after 10 seconds wait time. If you select Windows Vista, GRUB chainloads Vista for you at the Windows boot sector.
If you have a problem with changing the MBR code, as I did, you might prefer to just install the code for pointing to GRUB to the first sector of your Ubuntu partition instead. If you do that during the Ubuntu installation process, then Ubuntu won’t boot until you configure some other boot manager to point to Ubuntu’s boot sector.
Windows Vista stores all data for its boot manager in a boot folder. Windows Vista has a command line utility called bcdedit.exe. I used the free Windows Vista utility called EasyBCD to make the necessary changes. Detailed help here too.
Do you use Ubuntu? If yes, how good is it for you? If not, did I inspire you to try it out? 🙂
Hail Ubuntu, Hail the Free World! 🙂

Be the first to comment