![]() Google Chrome web browser latest version provides sync feature to synchronize web experience across multiple computers. Chrome users can save their bookmarks, extensions, web apps, theme, and browser preferences to their Google account, and once they enable the Sync feature, they can access them across multiple computers. That way, users can have the same web experience everywhere when browsing with Google Chrome browser.
Google Chrome web browser latest version provides sync feature to synchronize web experience across multiple computers. Chrome users can save their bookmarks, extensions, web apps, theme, and browser preferences to their Google account, and once they enable the Sync feature, they can access them across multiple computers. That way, users can have the same web experience everywhere when browsing with Google Chrome browser.
You can enable sync on as many computers as you’d like and across different operating systems. Google Chrome can only be synced to one Google Account at any given time. Be careful if multiple people share usage of the browser. If someone signs in to the sync feature with his or her Google Account on your computer, your settings on that computer will be added to the Google Account.
How it works?
- Your settings are saved in your Google Account. When you enable sync on a computer, your Google Chrome settings on that computer are saved in your Google Account. When you enable sync on another computer by signing in to the same Google Account, Google Chrome copies the settings you’ve selected to sync from your Google Account to the computer.
- Changes are synced instantaneously.Changes you make to your settings on one computer are automatically reflected on the other computers where you’ve enabled the sync feature.
Enabling Sync Feature
- Open Google Chrome.
- Click the wrench icon
 on the browser toolbar. (Mac users: If you don’t see the wrench icon, go to the menu bar at the top of your screen and click Chrome)
 - Select Options (Preferences on Mac and Linux).
- Click the Personal Stuff tab.
- In the “Sync” section, click Set up sync.
- Sign in to your Google Account in the dialog that appears.
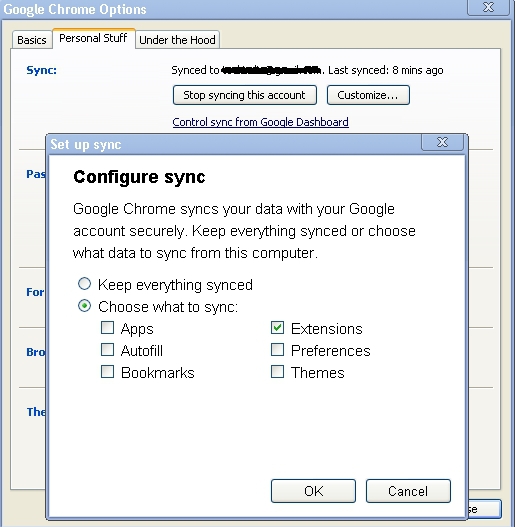
- In the “Set up sync” dialog that appears, choose what you want to sync.
- Sync everything: Select the “Keep everything in sync” option.
- Choose specific items to sync: Select the “Choose what to sync” option, then select the checkboxes for the items you want to sync.
- Apps from the Chrome Web Store
- AutoFill data (except for credit card numbers)
- Bookmarks
- Extensions from the Chrome Web Store (except those containing plug-ins)
- Preferences
- Themes
- Click OK.
- You’ll see a confirmation message once Google Chrome has finished copying your browser data to your Google Account. Click OKin the message.
Note: In Chrome OS, sync is enabled by default when you sign in with your Google Account. You can only sync to the account you used to sign in.
[advt]
Disabling Sync Feature
- Open Google Chrome.
- Click the wrench icon on the browser toolbar. Mac users: If you don’t see the wrench icon, go to the menu bar at the top of your screen and click Chrome.
- Select Options.
- Click the Personal Stuff tab.
- In the “Sync” section, click Stop syncing this account. (Instead of disabling sync entirely, you can choose what you want to sync by clicking Customize.)
- Click Stop syncing in the confirmation dialog.
Your data, like bookmarks and extensions, won’t be deleted from your computer or from your Google Account, but changes will no longer show up on your other computers or be saved in your Google Account.
Note: If you’re using Chrome OS, click the wrench icon and go to Settings > Personal Stuff. In the “Sync” section, click Customize and deselect the checkboxes for the items you don’t want to sync.[source]

Be the first to comment